
Spider plant propagation is incredibly beginner-friendly, with success rates over 90%. You'll need just a few basic tools: clean scissors, water or soil, and a container. Choose healthy spiderettes (baby plants) with visible aerial roots from your mature plant during spring or summer. Simply snip them off and place in water or well-draining soil, maintaining bright indirect light. Your new plants will develop strong roots within 2-3 weeks. The step-by-step process ahead will guarantee your propagation success.
Why Spider Plants Are Perfect for Beginners
When it comes to indoor gardening, spider plants stand out as one of the most forgiving and adaptable houseplants you'll encounter. You don't need special conditions to keep them thriving – they'll grow happily in various light conditions, from low to bright indirect light, and tolerate normal household temperatures between 60-80°F.
What makes these plants truly beginner-friendly is their resilience. You won't need to stress about perfect watering schedules, as they can survive occasional neglect. These graceful plants are native to Africa and have proven their adaptability across different growing environments worldwide.
They're also safe for your entire household, including pets. Their versatility means you can grow them in different containers or hanging baskets, and they'll adapt to most soil types as long as there's good drainage.
Best of all, if you want more plants, propagation is a breeze through their spiderettes, which can be rooted in either water or soil.
The Best Time to Start Propagating Your Spider Plant
You'll find the most success propagating your spider plant during spring and summer when growth is at its peak and conditions are ideal.
Your spider plant needs to be at least one year old and showing signs of maturity, such as consistent leaf growth and a slightly root-bound structure, before it's ready for propagation.
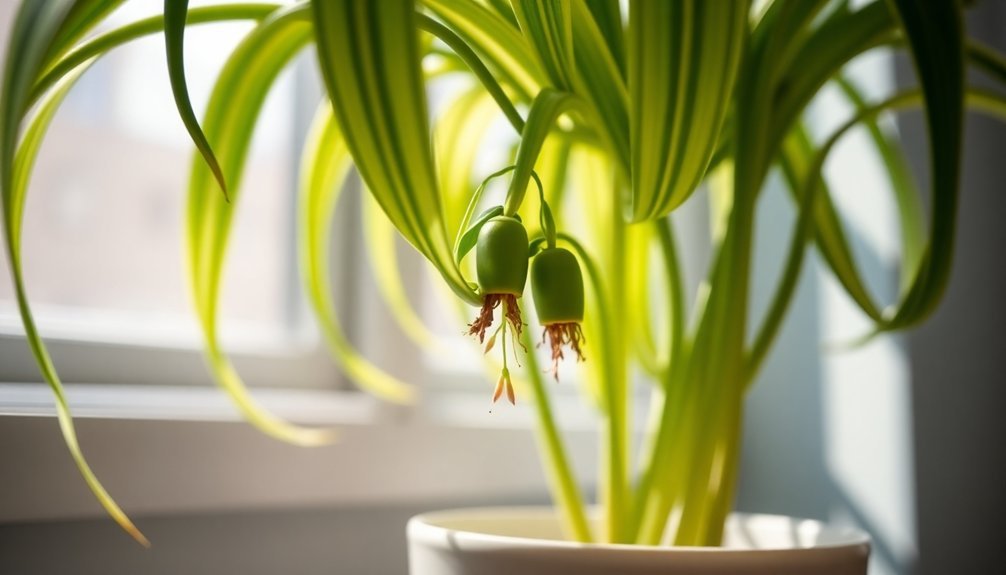
Watch for the development of spiderettes (baby plants) on long, arching stems – these small plantlets with visible aerial roots are your signal that propagation can begin. Using sharp, sanitized tools will help prevent disease transmission when you're ready to start cutting.
Spring Growth Window
Spring marks the ideal time to propagate your spider plant, as the season's natural growth cycle provides excellent conditions for success.
You'll find your plant emerging from its winter dormancy with renewed vigor, ready to produce healthy spiderettes and vigorous foliage.
During this growth window, your spider plant channels more energy into new growth, making it easier to establish root systems and adapt to new environments.
If your plant is at least a year old and actively producing baby plants, you're in prime position to start propagating.
Look for spiderettes with small roots already forming at their base, as these will give you the best results.
The plant thrives best in well-draining potting soil to support healthy root development during propagation.
Remember to provide bright, indirect sunlight and maintain proper humidity levels to support your plant's natural spring awakening and maximize your propagation success.
Mature Plant Signals
Knowing the right signals from your mature spider plant can make all the difference in successful propagation.
Watch for signs that your plant's ready to multiply, like visible roots emerging from drainage holes or above the soil surface. If you're watering more frequently than usual, it's likely your plant has become root bound and needs attention.
You'll notice slower growth and less vibrant leaves when your plant's outgrown its pot.
Pay attention to how your spider plant responds to water and nutrients – both overwatering and underwatering can prevent spiderette production. If you see fewer baby plants than usual, check your watering routine and consider switching to distilled water, as tap water's fluoride and chlorine can harm growth.
Healthy spider plants in proper growing conditions will naturally produce plenty of offspring during active growth periods.
Spiderette Development Signs
When your spider plant begins producing spiderettes, timing is essential for successful propagation. You'll want to wait until these baby plants show clear signs of maturity before detaching them. Look for spiderettes with at least five well-formed leaves measuring around 5cm in length and visible root protrusions at the base.
| Development Stage | What to Look For | Action Required |
|---|---|---|
| Early Formation | Small leaf buds | Keep attached |
| Mid-Stage | 5+ leaves, 5cm | Monitor growth |
| Ready to Plant | Visible roots | Start propagation |
Keep the spiderettes connected to the mother plant until they're strong enough to survive independently. Spring and summer offer ideal conditions for propagation, with bright indirect light and warm temperatures encouraging healthy development. Don't rush the process – a well-developed spiderette has a much higher chance of successful propagation.
Essential Tools and Materials for Successful Propagation

Before starting your spider plant propagation project, you'll need to gather basic tools like clean scissors or pruning shears, appropriate containers, and well-draining growing medium.
Sterilize all cutting tools with rubbing alcohol to prevent the spread of plant diseases and guarantee successful propagation.
Whether you choose water or soil propagation, make sure you have either clear glass containers with distilled water or 4-inch pots with quality potting mix ready to support your plant babies.
Basic Propagation Equipment Checklist
Successful spider plant propagation starts with gathering the right tools and materials. You'll need cutting tools like pruners or scissors for separating plantlets, and containers with good drainage for your new plants. A well-draining growing medium is essential for healthy root development.
| Essential Items | Purpose |
|---|---|
| Sharp scissors/pruners | Clean cuts for plant separation |
| 4" pots with drainage | Housing new plantlets |
| Quality potting mix | Supporting root growth |
Don't forget to prepare a bright, indirect light source and maintain proper humidity levels during the propagation process. Keep basic supplies like plant markers and water nearby. If you're trying water propagation, you'll also want to have a clear glass jar and distilled water on hand. These fundamentals will set you up for propagation success.
Sanitizing Your Propagation Tools
Clean tools are the foundation of safe and effective spider plant propagation. You'll need rubbing alcohol, water, bleach, clean cloths, and a soaking container to properly sanitize your equipment.
To protect your spider plants from diseases and harmful bacteria, sanitize your tools both before and after each use. You can either wipe scissors and shears with rubbing alcohol or soak them in a water-bleach solution for deeper cleaning.
Be sure to dry your tools completely afterward to prevent rust.
Make tool sanitization a consistent part of your propagation routine. Keep your cleaning supplies easily accessible, and always use clean tools when moving between different plants.
This practice will greatly reduce the risk of cross-contamination and guarantee your spider plant babies grow healthy and strong.
Identifying Healthy Spiderettes for Propagation
When propagating spider plants, selecting the right spiderettes is essential for success.
You'll want to look for vibrant green plantlets with small nodes at their base, as these indicate root development potential. The best candidates will already show tiny roots emerging, making them prime for successful propagation.
Here's what makes a spiderette perfect for propagation:
- Small knob-like protrusions at the base, signaling future root growth
- Fresh, bright green coloring that screams "I'm ready to thrive!"
- Moderate size that's easy to handle and establish
- Clear signs of emerging roots, nature's way of saying "plant me now!"
Remember to check that the parent plant is healthy and mature, ideally over a year old, as this greatly increases your chances of propagation success.
Step-by-Step Water Propagation Method

Water propagation offers one of the most reliable methods to grow new spider plants from your selected spiderettes. To begin, fill a clean glass container with distilled water and position your spiderettes so their nodes are submerged while leaves remain above water.
You'll need to maintain proper conditions for successful rooting. Place your container in bright, indirect sunlight and change the water occasionally to prevent bacterial growth.
Don't disturb the plantlets too much during this process – they'll need about 7-10 days to start developing roots.
Once the roots reach 2-3 inches in length, it's time for transplanting. Prepare a pot with well-draining soil mix, carefully transfer your rooted spiderette, and water thoroughly.
Keep the soil consistently moist for the first few weeks to help your new plant establish itself.
Soil Propagation Techniques Made Simple
When propagating spider plants in soil, you'll want to start with a light, well-draining potting mix that promotes healthy root development.
You can plant your spiderette directly into moistened soil, ensuring the developing roots or nodes are covered while keeping the crown slightly above the soil line.
Keep an eye on root development by gently tugging the plant after a few weeks – resistance indicates successful root establishment.
Best Soil Mix Selection
Creating an ideal soil mix stands at the heart of successful spider plant propagation. You'll want to combine general-purpose potting soil with coco coir, perlite, and orchid bark to achieve the perfect balance of nutrients and drainage. This mixture guarantees your spider plant's roots get the oxygen they need while maintaining just enough moisture.
Keep these essential factors in mind to create the perfect growing environment:
- Your soil's pH should stay between 6.0-7.5 – it's vital for nutrient absorption.
- Add perlite until your mix feels light and airy.
- Mix in organic matter to boost water retention and improve texture.
- Watch for signs your plant needs repotting – healthy spider plants grow fast!
Remember to fertilize every 3-4 months, and don't worry if your plant becomes slightly root-bound – spider plants actually prefer it!
Direct Planting Step-by-Step
Direct soil propagation involves four essential steps that transform spiderettes into thriving new plants.
Start by preparing a pot with drainage holes and filling it with moist, loamy potting mix, creating a small indentation for planting.
Next, select a healthy spiderette with visible nodes or roots, and cut it from the parent plant using sterilized scissors.
Remove any lower leaves that might rot in the soil.
Place the spiderette's base into the prepared indentation, covering it gently with soil while keeping the leaves above ground.
Water thoroughly to settle the soil around the plantlet.
Finally, position your newly planted spiderette in bright, indirect sunlight.
Keep the soil consistently moist as the plant develops its root system.
You can either separate it from the parent plant immediately or let it establish roots while still attached.
Monitoring Root Development
Successfully monitoring root development in spider plant propagation relies on understanding key growth indicators and maintaining ideal conditions.
You'll want to check the soil moisture daily and guarantee your spiderettes receive bright, indirect light while their roots establish.
Watch for these exciting signs that your propagation is thriving:
- Tiny root protrusions emerging from the spiderette's base within days
- Fresh leaf growth sprouting from the center after 1-2 weeks
- Gentle resistance when you softly tug the plant, indicating strong roots
- Multiple shoots developing, especially if you've planted several spiderettes together
Keep the soil light and loamy, and don't forget to maintain proper drainage.
Your spiderettes will show their happiness through vibrant growth and established roots within two weeks of planting.
Using the Natural Runner Method

Spider plants make propagation remarkably easy through their natural runners, which produce ready-to-grow spiderettes at the ends. You'll find these baby plants developing roots while still connected to the mother plant, giving you a head start on propagation.
To use this method, place a small pot with moist, well-draining soil next to the mother plant. Position a spiderette with at least five leaves into the soil while keeping it attached to the parent via the runner. Press the base gently into the soil and water thoroughly.
Keep the setup in bright, indirect light at around 20°C. Once the spiderette establishes itself and shows strong growth, you can snip the connecting runner. This natural approach lets the baby plant receive nutrients from its parent while developing its own root system.
Dividing Mature Spider Plants
When your spider plant becomes overcrowded or shows signs of decline, division offers an effective way to rejuvenate it and create multiple healthy plants.
Start by removing your plant from its pot and gently washing away soil to expose the root system. If the roots are tightly bound, soak them in water to make separation easier.
4 Simple Steps to Successful Division:
- Use clean, sharp tools to separate the roots into distinct sections.
- Remove any dead or damaged roots you find.
- Plant each divided section in fresh potting soil with good drainage.
- Keep your newly divided plants at 15°C until they establish themselves.
Water your divided plants thoroughly after repotting, and you'll soon see fresh growth emerging from these rejuvenated specimens.
Once they're established, move them to a warmer location to thrive.
Common Propagation Mistakes to Avoid

Even experienced gardeners can make mistakes during plant propagation that significantly impact success rates. With spider plants, you'll want to avoid four common pitfalls.
First, don't rush to separate plantlets before they've developed proper roots – this can shock the baby plants.
Second, make certain you're using well-draining soil mixed with perlite rather than dense, moisture-retaining mixtures that can lead to root rot.
Third, remember that lighting is essential; place your propagating plants in bright, indirect light or use grow lights if natural light is limited.
Finally, timing matters – while spider plants can be propagated year-round, you'll have better success during spring and summer when growth is most active.
Wait until roots are 2-3 inches long before transplanting to soil.
Caring for Newly Propagated Plants
Successfully caring for newly propagated spider plants requires attention to their specific environmental needs. Your new plants will thrive when you provide bright, indirect light and maintain consistent moisture until fresh growth appears.
Keep the soil slightly damp but never waterlogged, and use filtered or distilled water to protect tender roots from harsh chemicals.
For the best start in life, your baby spider plants need:
- A spot with bright, indirect sunlight to prevent leaf scorching while guaranteeing steady growth
- Moderate to high humidity, easily achieved through misting or a nearby water tray
- Well-draining potting soil that retains just enough moisture without becoming soggy
- Good air circulation to ward off fungal issues and promote strong development
Monitor your plants regularly and adjust care as needed to guarantee healthy establishment.
Signs of Successful Root Development

Observing root development in propagated spider plants provides clear indicators of success. You'll know you're on the right track when roots become visible within 1-2 weeks in water propagation, reaching 4-6cm before soil transfer. In soil propagation, watch for plant stability and resistance when gently tugged.
| Indicator | Water Method | Soil Method |
|---|---|---|
| Roots | White, visible roots within 2 weeks | Hidden but creates stability |
| Growth Signs | Downward root development | New shoots and leaves |
| Timing | 4-6cm roots before transfer | 2-3 weeks for establishment |
| Health Markers | Root density increase | Improved color and vigor |
Look for aerial roots emerging from the soil – they're excellent signs of a thriving plant. When you notice new leaves, shoots, and baby plants appearing, your propagation has succeeded, and the root system is well-established.
Troubleshooting Growth Problems in Baby Plants
When spider plant babies face growth problems, identifying the root cause helps determine the ideal solution. Your baby plants need proper growing conditions to thrive, just like their parent plants.
If you're noticing stunted growth or yellowing leaves, it's likely due to environmental or care-related issues.
- Don't panic if your newly planted babies aren't growing quickly – they're focusing on developing strong roots first.
- Check your water quality – fluoride can harm these sensitive plants, so switch to distilled or rainwater.
- Watch the lighting carefully – those yellow leaves might mean too much direct sun.
- Monitor the soil moisture – keep it consistently damp but never waterlogged.
Remember that spider plant babies won't flourish if their growing conditions aren't ideal.
Maintain temperatures between 65-75°F and provide bright, indirect light for the best results.
Frequently Asked Questions
Can I Propagate Spider Plants From Regular Leaves Instead of Spiderettes?
No, you can't propagate spider plants from regular leaves. You'll need to use spiderettes (plantlets) that have both roots and leaves. Single leaf cuttings won't develop roots or grow into new plants.
How Many Spiderettes Can I Safely Remove From One Parent Plant?
You can safely remove up to one-third of your spider plant's spiderettes at a time. Leave enough for the parent plant to maintain its energy, and wait a few weeks between harvests if you need more.
Will Variegated Spider Plants Produce Variegated Babies Through Propagation?
Yes, you'll get variegated babies from your variegated spider plant. The spiderettes typically maintain the same variegation pattern as their parent plant when you propagate them through any method – water, soil, or division.
Can I Use Rooting Hormone to Speed up Spider Plant Propagation?
Yes, you can use rooting hormone to accelerate spider plant propagation. While it's not necessary since these plants root easily, it'll speed up the process and help develop stronger roots for your spiderettes.
Do Spider Plants Need Special Fertilizer During the Propagation Process?
You don't need special fertilizer for spider plant propagation. A balanced, all-purpose fertilizer will work fine once your plant is established. Until then, just focus on providing proper water and light.
In Summary
With these simple steps, you'll find spider plant propagation isn't just easy – it's nearly foolproof. Whether you've chosen water or soil propagation, your patience will pay off as those spiderettes develop into healthy new plants. Don't worry if your first attempt isn't perfect; spider plants are forgiving, and you'll quickly get the hang of it. Before you know it, you'll have enough spider plants to fill your home or share with friends.
References
- https://www.livelyroot.com/blogs/plant-care/spider-plant-propagation
- https://hort.extension.wisc.edu/articles/spider-plant-chlorophytum-comosum/
- https://plantura.garden/uk/houseplants/spider-plant/propagating-spider-plants
- https://www.greenmatters.com/home/how-to-propagate-spider-plant
- https://www.gardeningknowhow.com/houseplants/spider-plant/propagating-spiderettes.htm
- https://bloomscape.com/plant-care-guide/spider-plant/
- https://www.thespruce.com/spider-plants-chlorophytum-definition-1902773
- https://www.patchplants.com/gb/en/read/plant-care/complete-guide-to-spider-plant-care/
- https://www.hgtv.com/outdoors/flowers-and-plants/houseplants/2019/spider-plant-indoor-care
- https://stacyling.com/spider-plant-care/
- https://www.youtube.com/watch?v=EKMFUYUbCcM
- https://www.wildinteriors.com/blog/2019/7/2/how-to-care-for-a-spider-plant-propagation-tips
- https://www.bigblogofgardening.com/proven-secrets-to-make-your-spider-plants-burst-with-babies/
- https://florasense.com/blogs/spider-plant-propagation-made-easy-how-to-propagate-spider-plants-in-water/
- https://www.marthastewart.com/how-to-propagate-spider-plants-8559433
- https://www.spider-farmer.com/blog/how-to-propagate-spider-plant/
- https://extensionpubs.unl.edu/publication/g1853/html/view
- https://hort.ifas.ufl.edu/media/hortifasufledu/therapeutic-horticulture-activities-database/pdfs/Rooting-Spider-Plants-in-Sphagnum.pdf
- https://growitmobile.com/plants/how-to-propagate-spider-plants/
- https://eureka-farms.com/blogs/news/how-to-propagate-spider-plants


Leave a Reply